Essential Equipment and Methods for Vegetable Fermentation
Fermentation Vessels
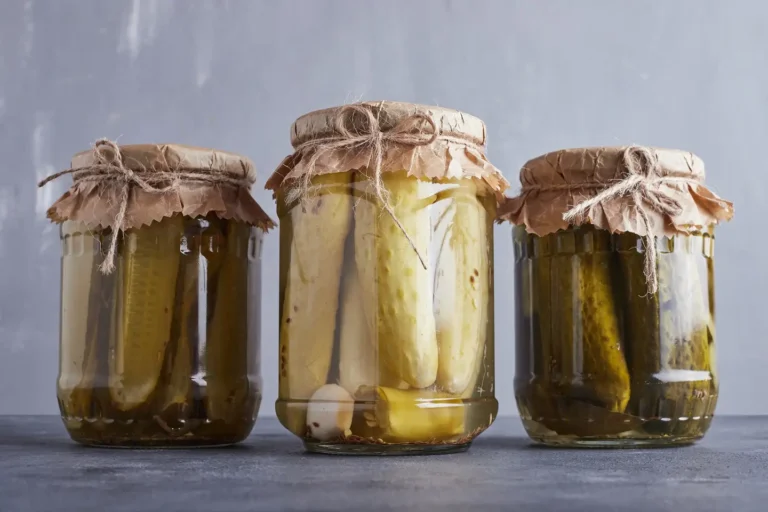
For making fermented pickles, we can choose from several types of containers. The simplest option is to choose intact mason jars with screw-on lids that seal well, but high-quality, pressure-resistant, clamp-lid mason jars and water-sealed fermentation vessels are also perfectly suitable for this purpose. We should avoid plastic containers, barrels, and bags whenever possible, as the acidic environment can cause harmful compounds to leach from these materials, which can be detrimental to health.
Mason jars with screw-on lids have a thin silicone coating on the inside of the lid, but the metal parts around the threads are very fragile and prone to rusting. If we also want to protect the environment by preserving the integrity of the lids for as long as possible, we can place a layer of cellophane under the lids. However, in this case, we must be very careful: the thin cellulose can easily wrinkle, and the lid may sit crooked on the jar’s threads. This can lead to spoilage of the pickles, so we should always check for proper sealing. It’s important to note that cellophane manufacturing also involves chemical treatments whose long-term health effects are currently unknown. We should be particularly careful not to confuse genuine cellophane with plastic-based, cellophane-like packaging materials, the so-called BOPP products.
If we want to ferment in clamp-lid mason jars, we should definitely choose high-quality, pressure-resistant pieces (for example, Fido, Le Parfait). For fermentation, those specimens are suitable whose closure mechanism is sufficiently tight – we can often only verify this by testing them. If yeast or mold appears in any clamp jar, this indicates faulty sealing, so instead of fermentation, we should store dry goods in these jars in the future. During lactic acid fermentation, we should always use the sealing rubber ring as well.
Special pressure-equalizing valves are not really necessary for vegetable fermentation. If it’s reassuring to think that a small accessory takes care of allowing the excess gas produced to escape freely, then we should acquire some special fermentation lids or airlocks. Once fermentation is complete, these lids must be replaced with solid, completely airtight sealing pieces.
Water-sealed pickling vessels can be obtained in different materials and sizes. Let’s choose one made of glass, or ceramic that has been fired at high temperatures (so-called stoneware). If we buy glazed ceramic, let’s also make sure that the vessel has been treated with lead-free glaze. Look for specimens whose rim groove is wide or deep enough, because with these there’s no risk that the water poured in will evaporate too quickly.
Weights and Press-Downs
During lactic acid fermentation, it’s particularly important to completely isolate the vegetables in the jar from oxygen-rich air. This is necessary so we can continuously ensure an anaerobic environment for the lactic acid bacteria, and so that no unwanted microorganisms causing rot or mold can settle on any plant parts that might protrude from the brine.
The simplest way to ensure an oxygen-free environment is airtight sealing with the appropriate fill level (as little “empty space” as possible). However, if we’re uncertain, then alongside proper sealing, it often comes in very handy to use some kind of weight or press-down inside the fermentation vessel.
It’s important to choose acid-resistant and food-safe materials for this purpose, such as weights made from glass, resin-free hardwood (for example oak, beech, or fruit wood), or ceramic. If these aren’t available, we can also set aside larger slices, discs, or chunks from the vegetables we want to pickle, and press these under the rim or shoulder of the vessel before sealing.
When using wooden press-downs, let’s be very cautious. Since these are light and float on the water surface, we should either put additional weight on them, or press them under the shoulder of the fermentation vessel, and pour enough salt brine over them so it covers the wood abundantly. If any problems arise during their use, soak them in vinegar water, then boil them out, and finally dry them in an airy place protected from direct sunlight. If the raw material doesn’t fill the vessel properly, place a smaller mason jar or glass filled with salt brine on top of the pickles, then fill the vessel around it as well and seal the lid that way.
Under no circumstances should we use plastic bags filled with water for pressing down! If possible, we should also avoid the plastic, star-shaped pickle weights available in household stores, as during lactic acid fermentation, the increasingly acidic environment can cause harmful compounds to leach from most plastics. This is also very important later during storage. Let’s always use glass or ceramic tools instead.
It’s also not advisable to randomly collect pebbles from the garden, riverbank, or seashore. If we want to use such stones, ask for expert help and choose volcanic rocks, for example, and perform an acid test with 5% acetic acid. Stones that don’t fizz can be used as weights after boiling. However, let’s pay attention to choose smooth-surfaced pieces, because dirt easily settles in cracks.
Although the temptation may be great, let’s forget about any “oh, this will fit perfectly” objects (painted or colored glazed porcelains, tinted glasses, metals). Let’s only use pharmacy tongue depressors, or other wood materials if we’re completely sure they’re resin-free and unbleached, and adhesive-free (otherwise they may contain lots of chemical residues).
Pickling with Salt Brine in Mason Jars
1. Prepare the Salt Brine
Pour enough chlorine-free water into a measuring vessel or pot as needed for the recipe. I always prepare a little more than necessary and work rounded to half or whole liters to make it easier to add the salt. Since the difference is negligible but calculating is much easier this way, we work with so-called baker’s percentages when determining the concentration of the salt solution. This means that 100% represents the weight of the water used to make the solution, not the already mixed solution (water and salt together). 1 liter of water weighs 1 kilogram (1000 g). Based on this, we can prepare salt solutions of different concentrations as follows:
Once we’ve gained some practice in pickling, we can work with tablespoons instead of a scale. 1 heaped tablespoon of normal grain-sized salt equals approximately 20 grams.
WHAT PERCENTAGE BRINE TO USE FOR WHAT?
For most vegetables, 2% is sufficient. We only need to use more if our taste requires it, or if we specifically want to slow down the fermentation rate (for example, with easily softening or sweeter raw materials). I’ve indicated this in the recipes where justified.
If some salt brine remains at the end of pickling, don’t pour out the excess: cook with it or keep it in a well-sealing jar until the next occasion (definitely not in a plastic bottle). It doesn’t have to be refrigerated, but if it doesn’t get used within a few weeks, store it in a cool place protected from sunlight. Always smell it before use, as any contamination on the jar might cause it to spoil.
2. Prepare the Vegetables
Wash and, if necessary, peel and remove damaged parts. Then cut or slice the raw materials we want to ferment into slices, rings, or chunks of any desired size. For this technique, it’s not worth chopping or grating any vegetable very finely, since this way the salt brine can’t penetrate well between the pieces. Moreover, microorganisms can access their nutrients on a much larger surface area, and the pickles can easily over-ferment and become soft prematurely.
3. Loosely Fill the Fermentation Vessel
Always put only enough vegetables in a jar so that the contents, including the weight, don’t reach higher than the jar’s neck/shoulder. Don’t try to cram as many pieces as possible into the vessel, leave plenty of room for the brine!
This is also the right moment for seasoning: sprinkle everything on the bottom of the jar or on top of the vegetables, or layer them alternately with the vegetables (everything will mix in the brine anyway, and light seasonings will float to the top). A suitable-diameter jam funnel can be very useful for filling the jars.
4. If Necessary, Press Down the Vegetables with a Larger Vegetable Piece or Weight
If we’re confident that our vessel seals airtight, we can safely skip this step. Press the discs or slices cut from vegetables, and wooden press-downs under the jar’s shoulder so they can’t float up. Simply place glass or ceramic weights on top of the vegetables.
Pay attention that if there are too few vegetables in the jar (for example, when making cabbage juice or beet kvass), choose the plant solution or wooden press-downs, otherwise the heavy weights will sink to the bottom of the vessel.
5. Pour the Brine
Pour the pre-prepared salt brine over the vegetables so that no more than 1-1.5 cm of space remains below the rim of the mason jar. Make sure there are no bubbles anywhere, shake the jar so the remaining air can escape.
It’s very important that no large air gap remains between the vegetables/brine and the lid! On parts in contact with oxygen-rich air, all kinds of unwanted microorganisms, including mold, will settle first – and then all our previous efforts will have been in vain.
The less air space we leave, the sooner the carbon dioxide produced during fermentation will fill it, and later this will act as a protective gas.
Dry Pickling with Salt in Mason Jars
1. Prepare the Vegetables
Wash and, if necessary, peel and remove damaged parts. Then cut or slice the raw materials we want to ferment into very thin slices, rings, or strips.
2. Add the Salt
Put the chopped/sliced/shredded vegetables in a large mixing bowl, then add 20 grams of iodine-free salt to every kilogram of vegetables. If using ground or crushed spices, we can mix them with the vegetables now as well.
3. Mix Together to Release Juice
Let the vegetables sit for a few minutes to release juice. We shouldn’t wait too long with this, because if we leave the salted raw materials alone for hours, most of the juice that comes out will evaporate from the bowl.
Knead the harder raw materials (for example cabbage) with vigorous movements, as if kneading dough. We’ve worked it enough when lifting a handful shows it dripping profusely with juice.
4. Tightly Fill the Fermentation Vessel
If using whole spices, put them at the bottom of the jar. We can also cover them with a large leaf or a few vegetable slices so they don’t get mixed among the pickle strands. Then press the salted vegetables along with their juice tightly into the mason jar, filling it completely up to the neck.
5. If Necessary, Press Down the Vegetables with a Larger Vegetable Piece or Weight
If we’re confident that the vessel seals airtight, we can safely skip this step. Press the discs or slices cut from vegetables, and wooden press-downs under the jar’s shoulder so they can’t float up. Simply place glass or ceramic weights on top of the vegetables.
6. Pour the Brine
Pour the vegetables’ own juice remaining in the bowl over the top of the developing pickles. If needed, supplement with salt solution so that no more than 1-1.5 cm of space remains under the lid. If a lot of juice is missing, use 2% brine; if only a tiny bit, it’s enough to drizzle chlorine-free water over the vegetables and sprinkle a pinch of salt on top.
Airtight Sealing
Alongside salting, airtight sealing also favors the multiplication of lactic acid bacteria. In an anaerobic environment, oxygen-dependent microorganisms die almost immediately, while the others will be gradually suppressed by the lactic acid produced by lactobacilli. The specific antimicrobial effect of lactic acid and its pH reduction safely preserve the product.
Whether we worked with brine or dry salting, once we’ve filled the fermentation vessel, seal it tightly immediately. Pull the lid tightly onto screw-top mason jars (or special valve lids), and seal clamp jars together with the gasket using their closure mechanism.
Tilt Test
We can check the secure sealing of screw-top mason jars by turning the full jar on its side, then rotating it around its axis. Apart from a few drops of brine trapped under the lid during sealing, no liquid should come from underneath it. If we notice continuous dripping, open and close the jar again! If it still leaks at the next check, the lid is deformed or damaged – replace it!
Labeling
When making, it’s worth noting some basic information on the jar as well. Later it will be very useful to be able to simply read the preparation date, the amount of salt used, or the list of ingredients and spices.
We can write directly on the jar or lids with alcohol-based markers, but it might be even better to use masking tape or painter’s tape. This is easily tearable or cuttable and can be removed from any surface without any effort or trace.
On vessels where active fermentation is taking place, stick the masking tape to the top or lid so the leaking juice doesn’t soak the writing.
Maturation
Always place the airtight sealed jars with proper labels on trays, and find them a place where they can work protected from direct sunlight and temperature fluctuations for the next 1-2 weeks. Never put them on top of each other, and don’t weigh down the mason jar lids with other weights!
Lactic acid bacteria feel best at 35-45°C, but higher temperatures also favor the multiplication of spoilage-causing microorganisms and excessively intensive gas production. Therefore, it’s worth fermenting pickles at a lower temperature, between 18-22°C. Of course, it’s not a fatal error if it’s warmer than this – we’ll just have to clean more often in the first few days. For process controllability, in summer find the coolest spot in our household. In winter, put the jars near heating elements (but definitely not on them), and we can also protect them from temperature fluctuations by placing them in a cooler bag or box.